- A 128x64 I2C OLED display This is the one i used
- Node JS (v10.19.0) with npm (v6.14.4)
- Raspberry pi (with sudo access and ubuntu, I am using v20.04.1)
- Pi-hole set up and configured
-
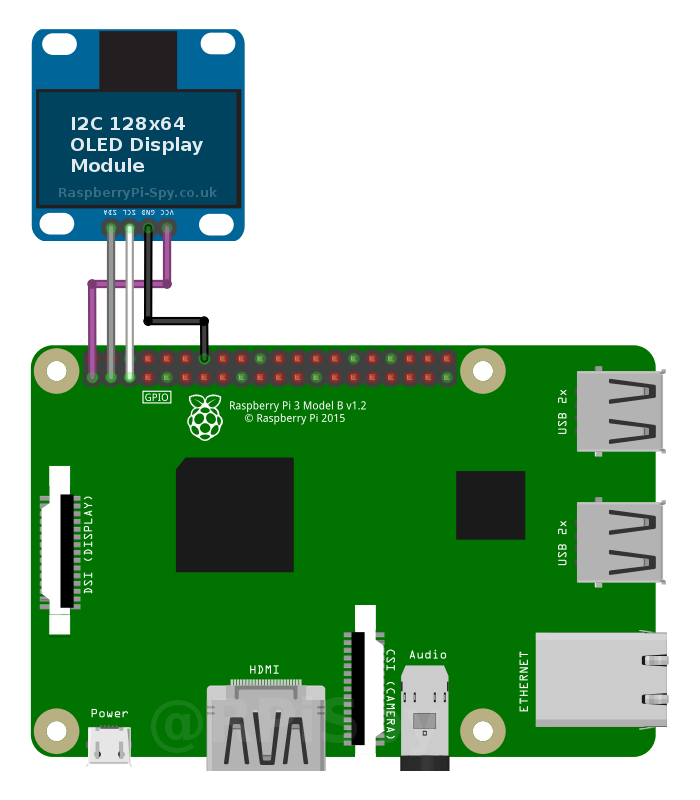
Wire up your screen like so:
-
One this is done SSH into your raspberry pi and install the i2c-tools package and run this command:
sudo apt install i2c-tools
sudo i2cdetect -y 1
This should get the following:
copy the following address which for this example will be "0x3c" -
We now have to install the following npm packages:
npm install i2c-bus
npm install oled-i2c-bus
npm install oled-font-5x7
npm install axios
this will install the i2c-bus, oled-i2c-bus, oled-font-5x7 and Axios packages
-
Now we get to start writing code!
Lets start with the following code:var i2c = require('i2c-bus'), i2cBus = i2c.openSync(1), oled = require('oled-i2c-bus'); var font = require('oled-font-5x7'); var opts = { width: 128, height: 64, address: 0x3C }; var oled = new oled(i2cBus, opts);
This will just give us the 'oled' object that we can use to communicate over the i2c bus. Remember to change "address" to what you got in step 2.
Now write the following code:oled.turnOnDisplay(); oled.clearDisplay(); oled.setCursor(1, 1); oled.writeString(font, 1, 'Huskies are the best breed of dog', 1, true);
This will turn on the display, clear it then set the cursor to the top left of the screen then write the text onto the screen. The paramters for WriteString are (font(obj), size(int), string(str), wrapping(bool))
-
Lets now give it a spin! Save your script and run the command:
sudo node oled.js
Remember to use sudo as the raspberry pi needs to access the IO pins
You should now see this on the screen:
Nice -
Let's now do something a little more interesting. We're now gonna display the Pi-hole stats now.
Lets make a new file and start from scratch.
Add the code below (or look at the file included in the repo):var i2c = require('i2c-bus'), i2cBus = i2c.openSync(1), oled = require('oled-i2c-bus'); const font = require('oled-font-5x7'), axios = require("axios"); var opts = { width: 128, height: 64, address: 0x3C }; var api_url = 'http://localhost/admin/api.php'; var oled = new oled(i2cBus, opts); async function UpdateLCDAsync() { try { var res = await axios.get(api_url); var piholedata = res.data; } catch (err) { console.error(err); } var toprint = `DNS Queries: ${piholedata.dns_queries_today}\n` + `DNS blocked: ${piholedata.ads_blocked_today}(${Math.round(piholedata.ads_percentage_today)}%)\n` + `Blocklist: ${piholedata.domains_being_blocked}`; oled.clearDisplay(); oled.setCursor(1, 1); oled.writeString(font, 1, toprint, 1, false); } setInterval(() => { UpdateLCDAsync(); }, 5000);
Lets do a quick rundown of what we just wrote.
Basically we made an async function that executes every 5 seconds that sends a get request to the api to get a JSON responce, then we can put that in thepiholedataobject and get the data from there.
(The responce looks sorta like this btw):
-
Save the script and run it! You should see something like this:
Nice^2 -
Now the problem with this is that the script will end when the process ends. If only there was some way of running it... forever
Of course there is! With the package called forever
Install it with:npm install foreverThen foreverly process with:
sudo forever start oled_script.jsRemeber that we need sudo as the pi needs to access the IO pins.
Pro tip!
You can list and stop the processes later with:sudo forever list sudo forever stop [process id] -
Enjoy! You now have a tiny oled screen to view your Pi-hole stats with!
Now go forth and conquer! with your tiny oled screen!