ReaLearn Controllers
- 1. Basics
- 2. General tips regarding controller setup and usage
- 3. List of control standards
-
4. List of controllers
- 4.1. Akai APC Key 25 MkI
- 4.2. Akai MPD 218
- 4.3. Arturia KeyLab MkII
- 4.4. Arturia MiniLab mkII
- 4.5. Behringer BCF2000
- 4.6. Behringer FCB1010
- 4.7. Behringer MOTÖR 61/49
- 4.8. Behringer X32
- 4.9. Behringer XR18
- 4.10. Behringer X-Touch Compact
- 4.11. Behringer X-Touch Mini
- 4.12. Behringer X-Touch One
- 4.13. DJ TechTools Midi Fighter Twister
- 4.14. Evolution UC-33
- 4.15. Hexler TouchOSC Mk1 (the older version)
- 4.16. Hexler TouchOSC (the recent version)
- 4.17. iCON Platform M+
- 4.18. iCON Platform X+
- 4.19. Korg nanoKONTROL2
- 4.20. Korg padKONTROL
- 4.21. Nektar Panorama P6
- 4.22. Novation Launch Control XL MkII
- 4.23. Novation Launchpad Pro
- 4.24. Novation SL MkIII
- 4.25. Nord Stage 3
- 4.26. OSC/PILOT
- 4.27. PreSonus FaderPort Classic
- 4.28. PreSonus FaderPort 8
- 4.29. RME ARC USB
ReaLearn strives to support any general-purpose MIDI/OSC controller out there. However, there are some things you should know:
-
Not every controller works out of the box.
-
There are controllers which might need some initial preparation in order to work optimally with ReaLearn.
-
Don’t fear this initial effort, it can pay off very quickly. ReaLearn is designed to get the most out of your controller and make it work the way you want it, not some company that wants to impose a certain type of workflow on you.
-
The versatility of a controller is a weakness but at the same time a strength. Taking some time to get to know and prepare your controller can make you end up with a tool that is much better suited for what you are trying to do than some bling-bling off-the-shelf solution.
-
-
Some controllers don’t work perfectly, especially when it comes to the feedback direction.
-
Among those controllers that support MIDI feedback, not all of them handle the feedback messages flawlessly.
-
Depending on the nature of the particular problem, it might be possible to fix it in future ReaLearn versions. Therefore, if you encounter a problem in this area, feel free to raise an issue.
-
-
Some controllers might have unique features that you can only use if you bring a bit of MIDI know-how and are ready to use advanced ReaLearn features.
-
Example: A controller might offer a way to change the appearance of an LED ring, but only via system-exclusive MIDI messages.
-
First, have a look if there’s a controller preset already. Maybe it supports those advanced features already.
-
If not, ReaLearn offers the following features for such scenarios:
-
Mapping lifecycle actions (e.g. for sending MIDI sys-ex data on mapping activation)
-
Raw MIDI source (for sending MIDI sys-ex data in response to target value changes)
-
MIDI script source (same but for more complex scenarios)
-
[midi-send-message] target (for sending MIDI sys-ex data triggered by a source)
-
-
Even though ReaLearn is made for any controller, it’s still useful to have a list of specific controllers and how they work in combination with ReaLearn.
The following basic setup hints are usually valid, no matter the specific controller:
-
Put your controller’s buttons into momentary mode, not toggle mode.
-
If you are in the lucky situation of owning a controller with endless rotary encoders, by all means, configure them to transmit relative values, not absolute ones!
-
Otherwise, you can’t take advantage of ReaLearn’s advanced features for sources emitting relative values, such as the "Step size" or "Speed" setting.
-
Also, preventing parameter jumps can never be as effective in absolute mode as in relative mode.
-
-
If there are issues, consult the Troubleshooting section in the first part of this guide.
Consider the following general usage hints:
-
If the device supports visual feedback and different LED colors, the LED color often depends on the target value and can be manually adjusted using "Source Min/Max" in the "Glue" section of the mapping.
Provided schemes: DAW
Although the term "Mackie Control" refers to a real controller device, it’s nowadays most famous as a protocol standard for DAW controllers. This particular ReaLearn controller preset supports large parts of this standard. You can think of this standard as …
-
an agreement which buttons/faders/encoders/LCDs/etc. a proper DAW controller should have,
-
which MIDI messages they send and receive
-
and which effect the control elements should have on the DAW.
It’s not magic, it’s mostly just an agreement on which MIDI messages to use - which is very useful because this agreement is what makes it possible that different DAW controllers of all kinds of manufacturers can instantly work with any DAW that supports the Mackie Control protocol.
If you have a (DAW) controller device which supports the Mackie Control standard, you don’t necessarily need to find a specific preset for your controller or craft your own one, you can just use the "Mackie Control" preset.
|
Note
|
Because this is a controller preset, this preset is only about:
It’s not about the effect, e.g. letting the fader control your track volume! In order to get an effect, you need to choose a suitable main preset or build some main custom mappings yourself (it’s very easy because that’s what ReaLearn is all about!). There’s one main preset called DAW control in the Helgoboss ReaPack repository which makes extensive usage of the capabilities of the Mackie Control preset. If you need inspiration or help how to build main presets for the Mackie Control preset, have a look at it! |
In addition to getting descriptive control element naming (e.g. play or stop), using this preset should give you instant compatibility with some main presets available on the Helgoboss ReaPack repository.
When you create main mappings using this controller preset, you can - as always - use the "Learn" function. However, Mackie-compatible controllers often have displays, which you can of course not learn because they are not control elements. They can only display things, so they only support the feedback direction. You can make use of them by choosing the corresponding virtual source (Multi):
| Virtual control element ID | Display | Description |
|---|---|---|
|
7-segment assignment display |
Allows you to display a number between Use an arbitrary feedback-enabled target to make it display the value as percentage. As with all kind of numeric feedback (also motorized faders and LEDs), you can use e.g. the mapping’s Source/Target Min/Max settings to adjust the displayed value range. This display also supports text feedback but that’s not very useful with only 2 letters. |
|
7-segment timecode display |
Allows you to display digits but also rudimentary text. It’s typically used to display a time, e.g. the time of the current play position. For this use case, simply combine it with the target Project: Seek target, choose Textual feedback in the Glue section and enter one of the You can project arbitrary text on this display but because it’s just a 7-segment display, some letters are not very readable. |
|
First line of a channel display |
This display supports all latin characters. You can use it with all kinds of targets with both numeric and textual feedback. You need to replace the asterisk with the desired channel number (a number between 1 and 8), e.g. |
|
Second line of a channel display |
Same as above, just the second line. If you want to target both lines at once because your text is quite long, you can do that by using the MIDI Display source and setting Line to |
|
Important
|
ReaLearn is designed to support any controller, so even if your controller is not on the list, you probably can make it work with ReaLearn! |
The purpose of this section is to write about experiences with specific controllers that have been tested in combination with ReaLearn.
There’s a broad variety of general-purpose MIDI controllers out there and there will be even more in the future. Of course, I don’t have the resources to test them all, there are way too many. That’s why this section very much depends on your contribution!
Disclaimer: The information in this document is given to the best of my knowledge. It could be wrong or outdated.
|
Tip
|
The philosophy of most official controller presets is to model the controller as faithfully as possible by providing a 1:1 mapping of real control elements to virtual control elements. Depending on the type of controller, the virtual control elements are sometimes numeric, sometimes named and sometimes both. Some controller presets offer a controller layout (and thus can be instantly used with the Projection feature), others not (yet). |
This controller works with ReaLearn out of the box, including feedback. It doesn’t have encoders though, so the full potential of ReaLearn can’t be used.
-
Akai APC Key 25
There’s an unofficial preset.
Instructions and preset for this device have been contributed by dissofiddle.
The device itself:
-
Change the relative mode to mode 1 (in the midi editor or with on-board preset editor). It corresponds to relative mode 2 of ReaLearn.
-
Change all the buttons and pads to gate (which is momentary).
-
Change the options "global > pad led" to "on trig" (otherwise it has conflicts with pad light feedback). I don’t know how to do this with the software preset editor, but you can do this with the onboard/embedded preset editor in the global settings of the KeyLab.
REAPER and ReaLearn:
-
KeyLab has 3 modes of operation : Analog Lab, DAW and User.
-
To make it work, you should use 2 ReaLearn instances:
-
One for DAW mode:
-
Control input : KeyLab Mk2
-
Feedback output: MIDIOUT2 (KeyLab Mk2)
-
Controller preset: Mackie Control
-
-
One for User mode (with user preset set as above):
-
Control input: MIDIIN (KeyLab Mk2)
-
Feedback output: MIDIOUT2 (KeyLab Mk2)
-
Controller preset: KeyLab Mk2
-
-
-
The reason is that transport buttons only works with MCU and that you can’t use both the Reaper native MCU with MIDIOUT2 port and set the feedback in ReaLearn to MIDIOUT2 (KeyLab Mk2) port at the same time … but you can with ReaLearn MCU.
About the name of the preset:
-
DAW buttons are the 10 buttons above transport buttons.
-
Fader buttons are the buttons below the faders.
-
Bank A/B defines the bank when switching with part1/next; part2/previous and live/bank button in User mode.
-
Arturia KeyLab MkII
This keyboard works, including its relative encoders and since ReaLearn v2.6.0 also feedback via pad LEDs with different colors.
By default, all encoders except the leftmost ones are configured to transmit absolute values (Option "Absolute"). I strongly recommend changing this to transmit relative values (Option = "Relative #1"). Use Arturia’s MIDI Control Center to apply this change to each encoder:
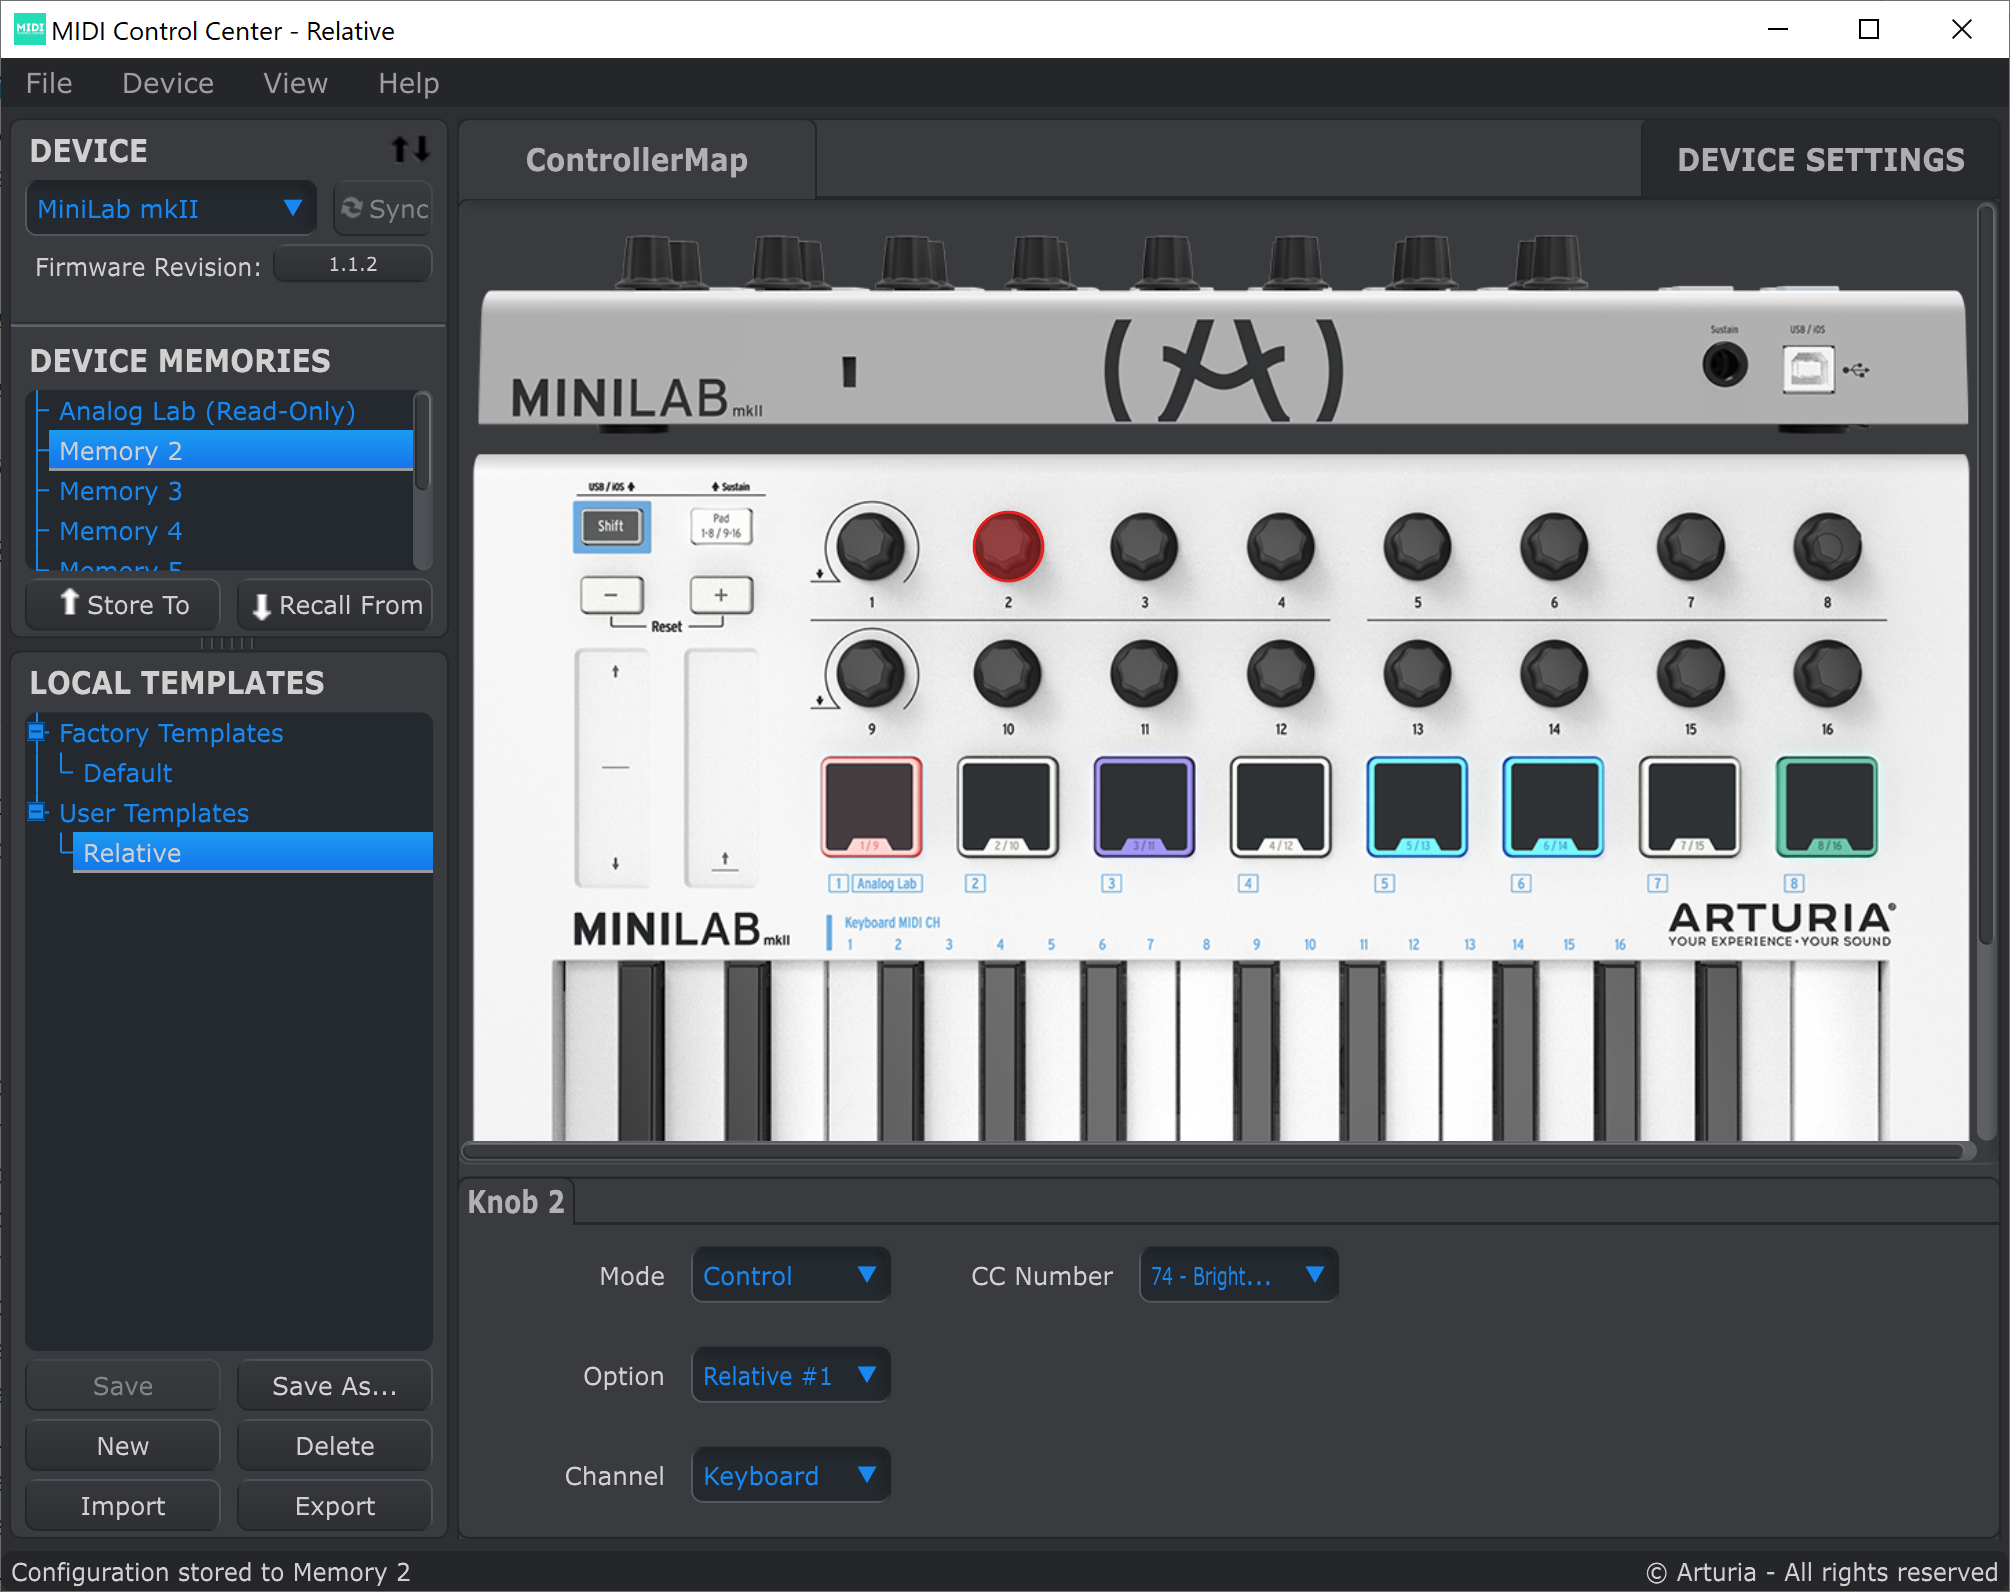
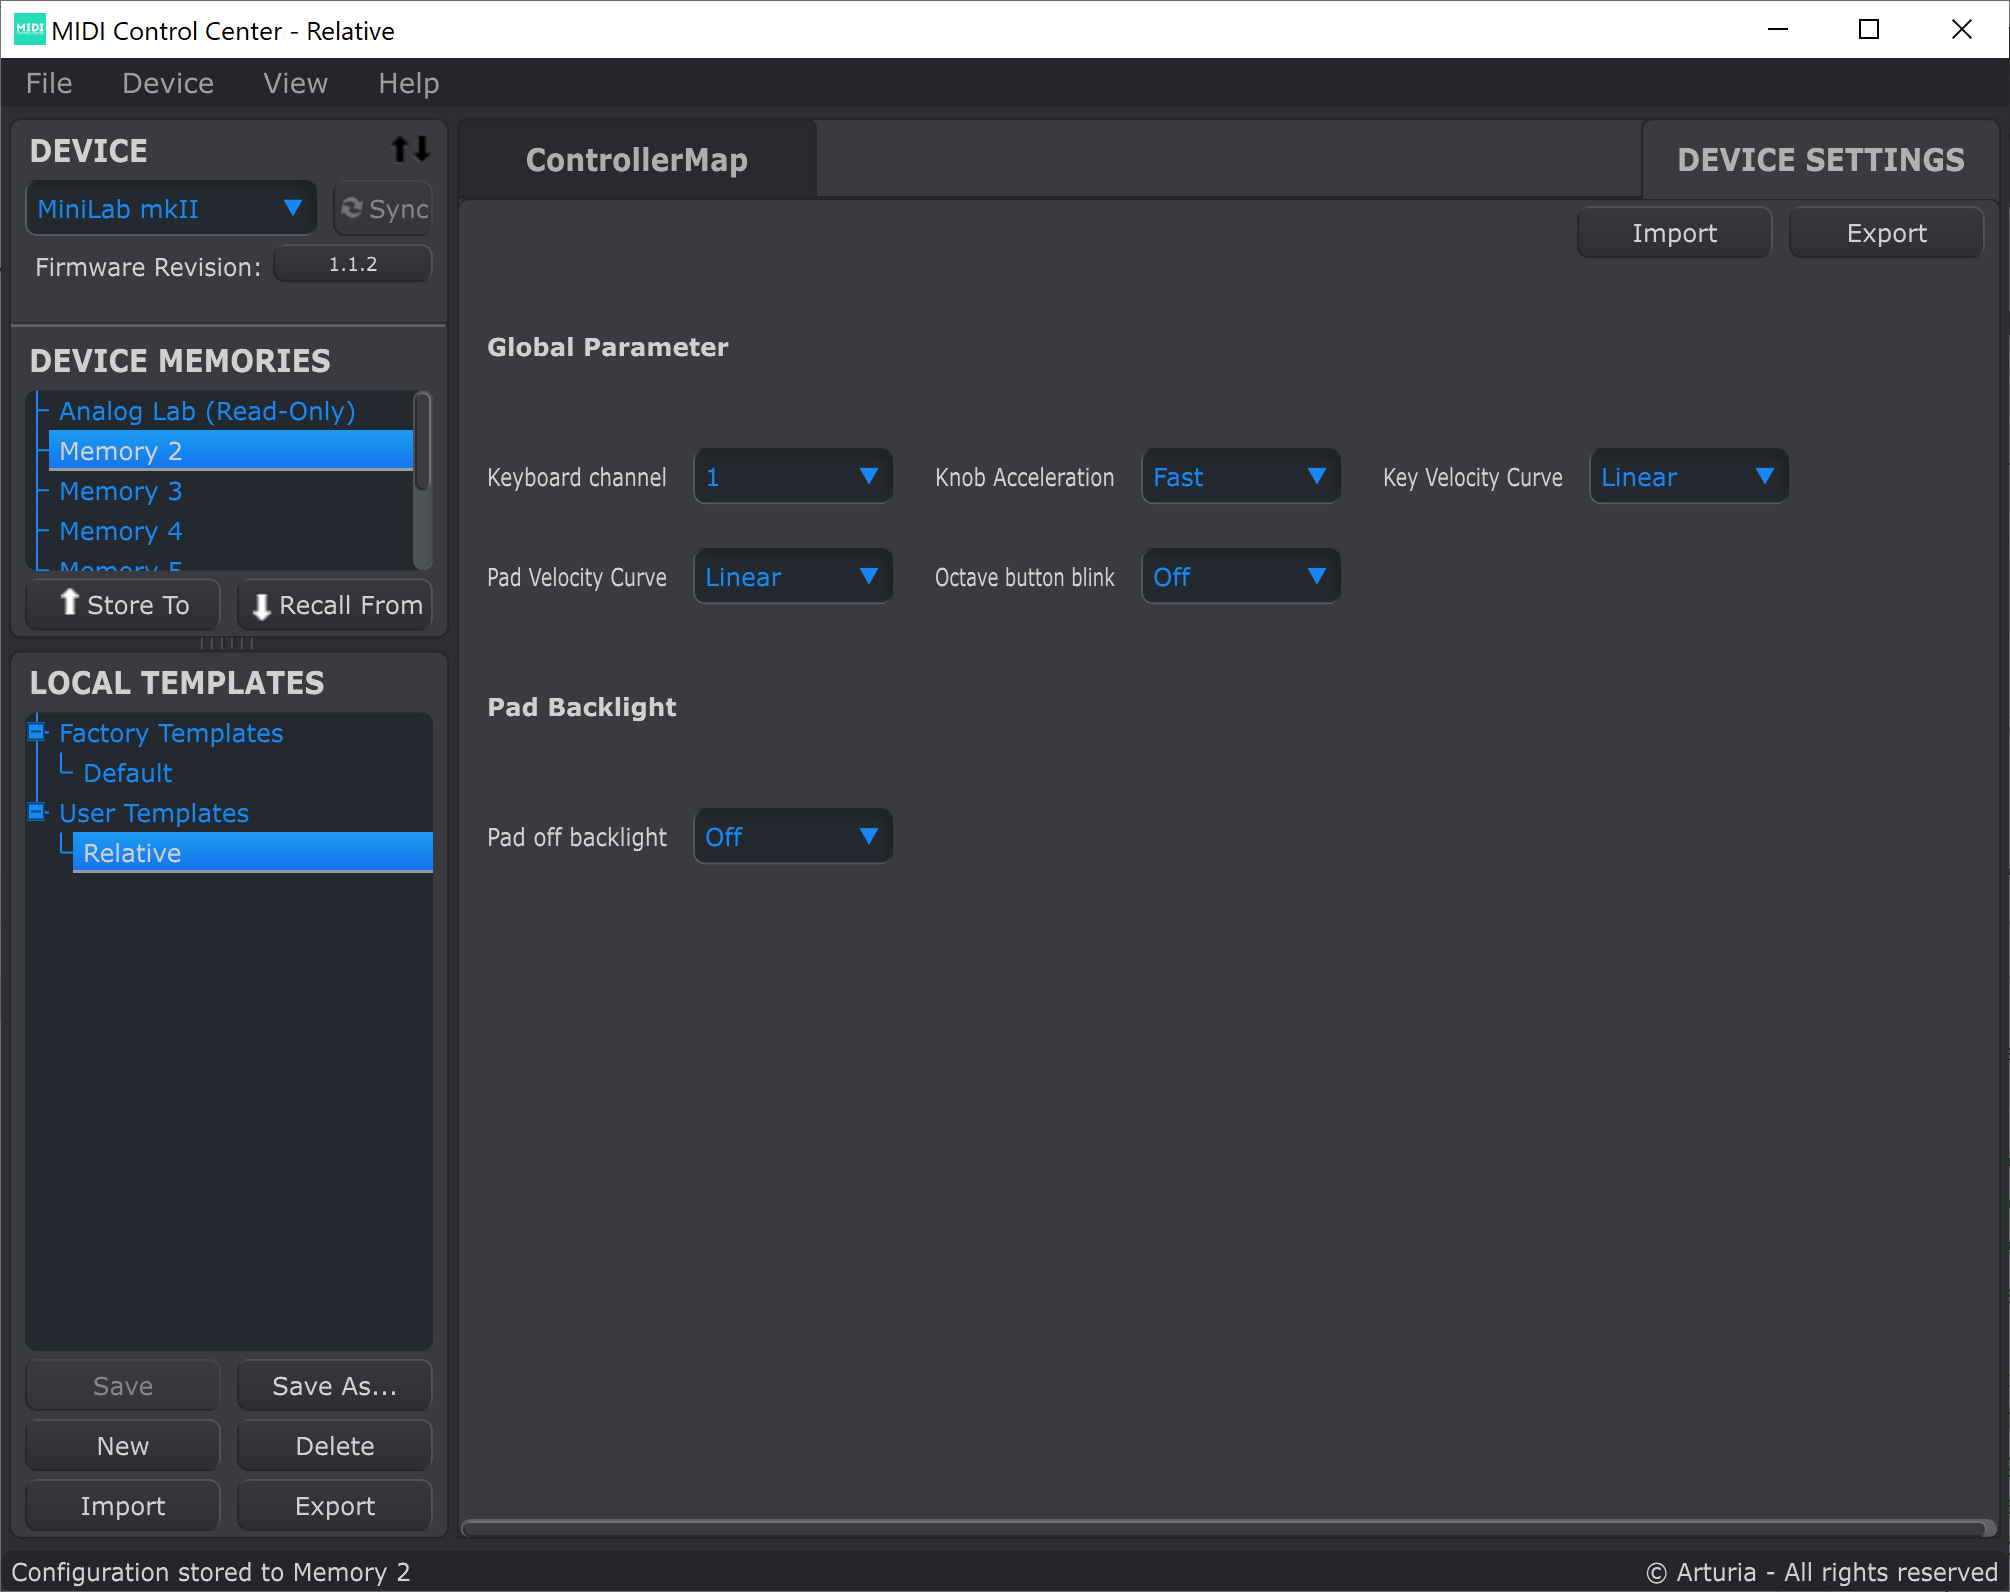
Furthermore I recommend to set the colors of all the pads to "None". This way ReaLearn has best control over them. One more thing that can help is to switch off "Pad off backlight" to "Off" (you might need to update the firmware to get this option):
All MiniLab mkII controller presets assume relative values.
-
Arturia MiniLab mkII
-
Visual feedback for the pad LEDs works thanks to ReaLearn’s Raw MIDI / SysEx which uses system-exclusive MIDI messages to control the LEDs.
-
LED color depends on the target value and is adjustable via "Source Min/Max".
-
This is one of the devices which needs the "Send feedback after control" workaround for the "Toggle button" mode, so the pad LEDs might flicker a bit when using it.
4.5. Behringer BCF2000
There’s an unofficial preset contributed by Torsten Anders.
4.6. Behringer FCB1010
There are unofficial presets contributed by faldurn.
There are unofficial presets contributed by faldurn.
I haven’t tried this device myself but a user was so kind to provide the following basic setup instructions:
-
Make the x32 use a static IP address (x32 "Setup" → Tab "Network").
-
Create a new OSC device in ReaLearn:
-
Use port 10023 (!!!) and uncheck "Can deal with OSC bundles".
-
-
Add a mapping that periodically sends OSC message
/xremoteto the x32 (otherwise it will not respond to commands sent by ReaLearn):-
Source
-
Source Category: REAPER
-
Type: Timer
-
Millis: 6000
-
-
Target
-
Type: OSC: Send message
-
Output: Feedback output
-
Address:
/xremote -
Argument: Float
-
Range: 0.0000 - 1.0000
-
-
Everything works, including feedback for motorized faders and LEDs.
ReaLearn can use this device in two modes, each of which has different (dis)advantages:
-
Standard mode
-
All controls work, including feedback.
-
Button LED feedback looks a bit confusing in toggle mode (but works correctly if you switch on "Send feedback after control" in the mappings).
-
Needs some preparation via X-TOUCH Editor.
-
-
MC mode:
-
No preparation necessary.
-
Button LED feedback works nicely.
-
Some controls can’t be used:
-
Push 15 and 16
-
Encoders 9 - 14
-
-
LEDs for encoders 9 - 16 can’t be used.
-
I recommend the "Standard mode" because all controls are supported.
No matter the mode of operation, the effective fader resolution is 7-bit only. This seems to be an inherent restriction of this device.
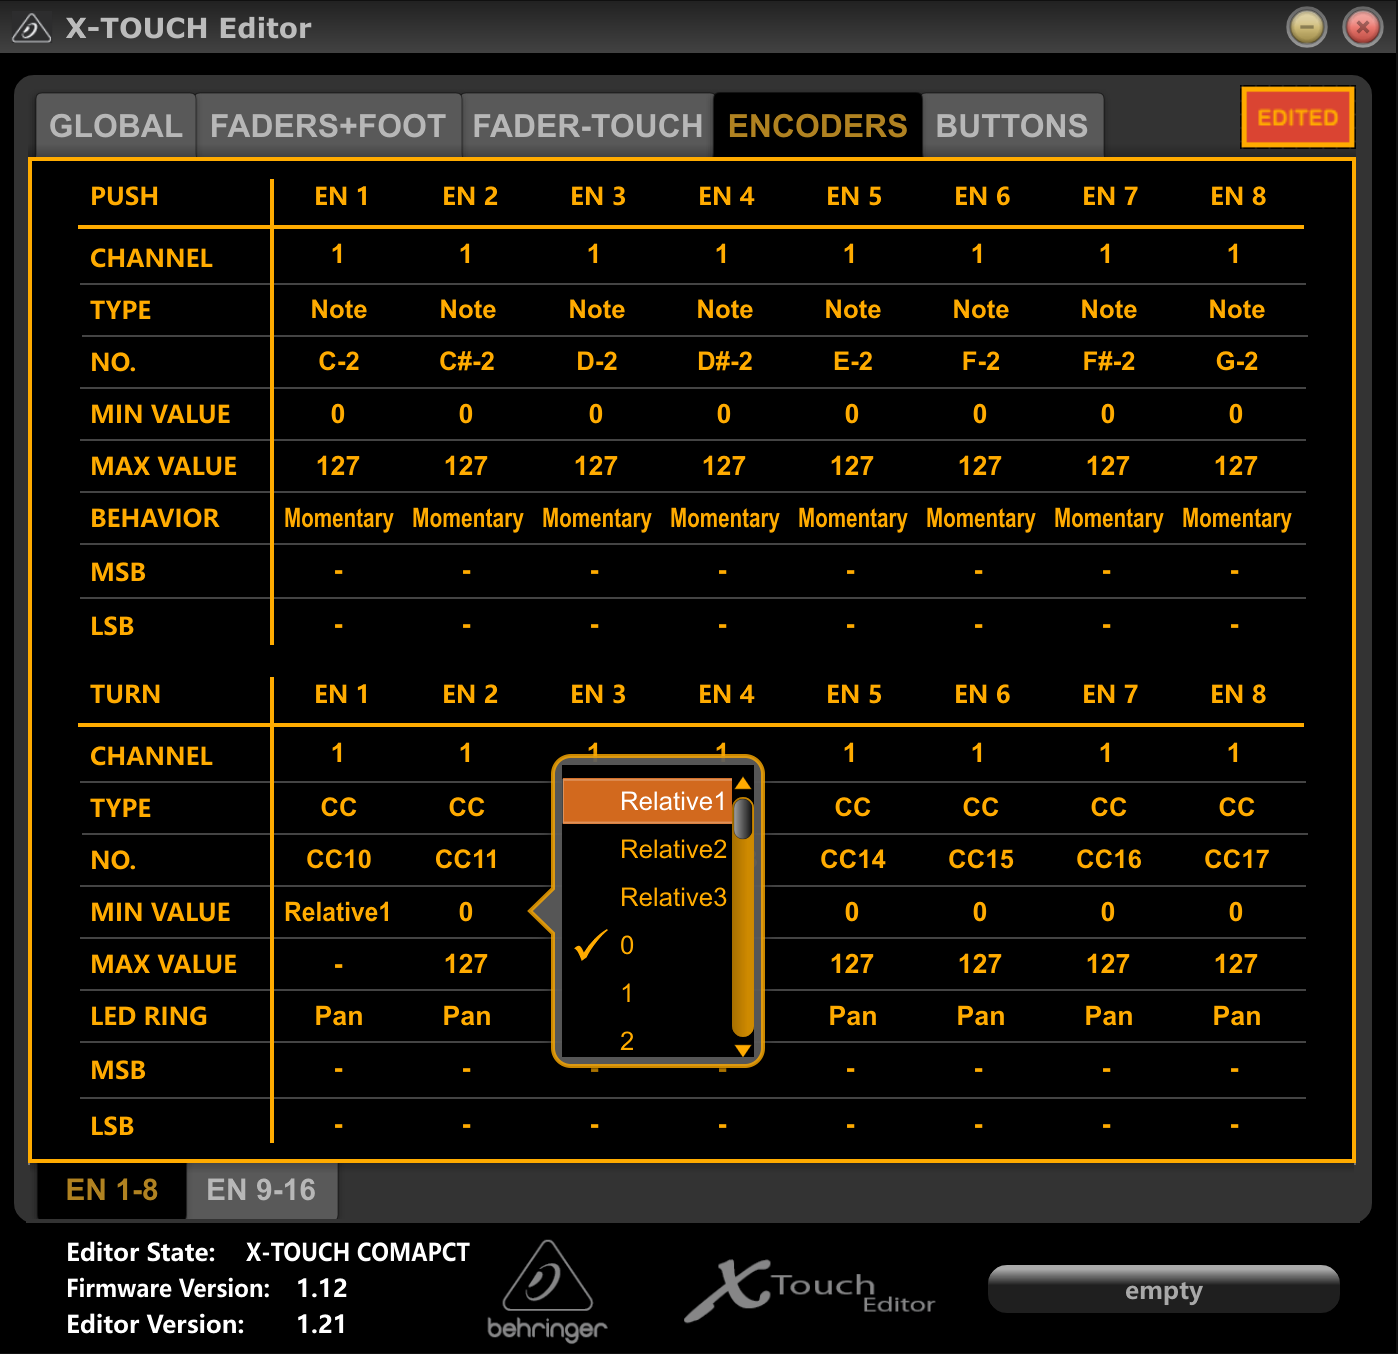
By default, the encoders are configured to transmit absolute values (MIN VALUE = "0"). It’s important to make them transmit relative values (MIN VALUE = "Relative 1"), not just because relative control is superior but also because this device tries to be clever in combination with encoder feedback but doesn’t really get it right. Absolute control will lead to some kind of flickering when controlling parameters and using feedback. Use the X-TOUCH Editor to apply this change to each encoder (EN 1-8 and EN 9-16) in each layer:
The following controller presets assume relative values.
-
Behringer X-Touch Compact: Layer A.
-
Behringer X-Touch Compact - Layer B: Layer B.
In standard mode, this device tries to be clever with the button LED feedback but doesn’t get it right. It can lead to wrong LED states when using "Toggle button" mode. This can be fixed by enabling "Send feedback after control" for the corresponding mappings, which is already taken care of in the controller presets available on ReaPack.
4.11. Behringer X-Touch Mini
From what I’ve heard, configuration is similar to the X-Touch Compact.
There’s also an unofficial preset contributed by Thomas.
Works!
This one provides many modes. The most important ones are:
-
MC modes: The MC modes cover all buttons and work great with the "Mackie Control" preset. A potential downside is that the device itself controls the "Master" button, so you can’t use that button in ReaLearn to customize its logic.
-
MC Std: You should use this if you have a firmware < 1.10 installed.
-
MC user: You should use this if you have firmware 1.10 installed.
-
-
MidiRel: This has the advantage of having a freely assignable "Master" button. The downside is that the fader resolution is only 7 bit! Moreover, I’ve not yet created a controller preset for the MIDI mode.
-
Mackie Control: This works great.
This controller works very well with ReaLearn, including feedback and LED color selection. Special feedback features such as the indicator type are currently not configurable from the ReaLearn user interface.
The following instructions relate to firmware 02 Oct 2019.
-
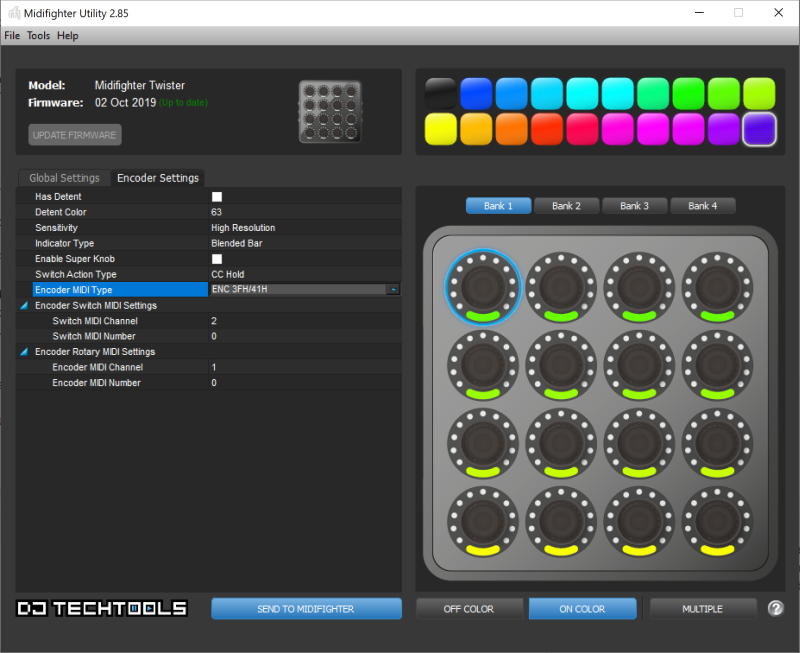
Encoders: By default, the Twister’s encoders are configured to transmit absolute values (Encoder MIDI Type = "CC"). I strongly recommend changing this to transmit relative values (Encoder MIDI Type = "ENC 3FH/41H") in order to unlock the full potential of this awesome device.
-
Use the Midi Fighter Utility to apply this change to each encoder:
You can also do this using the "MULTIPLE" button: . Press the "MULTIPLE" button. . Select all controls via mouse clicks. . Change the Encoder MIDI Type. . Press "CANCEL"
-
If you want to make use of the Twister’s built-in encoder acceleration, you should set the encoder sensitivity to "Velocity sensitive". In order to make use of it, make sure that ReaLearn’s Step size Max or Speed Max is set high enough, both in the controller mappings (already done in the latest Twister controller presets) and your specific main mapping.
-
-
Colors: For most usage scenarios, I suggest switching the OFF COLOR to black instead of the default of blue. The ON COLOR doesn’t matter as it can be controlled by ReaLearn.
-
Side key functions: In order to make all side keys available in ReaLearn, make sure to set all Side Key Functions (in Global Settings pane) to "CC Hold" and disable "Bank Side Buttons".
All Midi Fighter Twister controller presets available on the Helgoboss ReaPack repository assume relative values.
-
DJ TechTools Midi Fighter Twister: First virtual bank.
-
DJ TechTools Midi Fighter Twister - Bank 2: Second virtual bank.
-
Even though the Twister has its own bank/paging feature, I would recommend to use ReaLearn’s built-in conditional activation feature instead. This provides advantages, for example when using the Controller Projection feature.
-
LED color depends on the target value and is adjustable via "Source Min/Max".
-
If you want to set the LEDs of the Twister to a fixed color layout instead of letting the LED color change dynamically in response to target parameter values changes, I can recommend Stereokai’s Midi Fighter Twister Color Designer, a small web app running in your browser. It lets you configure the LED colors in a playful way and export them to ReaLearn.
-
Quit REAPER (to give the web app exclusive access to the Twister MIDI device).
-
Configure the LED colors by turning the encoders.
-
Press "Copy colors to clipboard".
-
Close the Browser tab.
-
Start REAPER.
-
Add a main mapping with only feedback enabled.
-
Open the "Advanced settings"
-
-
Evolution UC-33 (contributed by Roger Green)
-
Made for device preset 1 and channel 16.
-
This is the main OSC app which I use to test ReaLearn’s OSC capabilities. It works for both control and feedback.
Feedback for control elements that transmit messages with multiple arguments might not work as desired at the moment.
E.g. TouchOSC expects values for both axes in case of X/Y controls instead of being satisfied with just one value and leaving the other axis untouched.
Currently, ReaLearn can only send feedback messages that contain one real value and sets the other unchanged values to Nil.
TouchOSC:
-
Settings → OSC
-
Host: {osc_host_instruction}
-
Port (outgoing): {osc_port_instruction}
-
Port (incoming): {osc_port_instruction} Preferably the same number as Port (outgoing).
-
|
Important
|
In general, you need to set it up using OSC, not the TouchOSC MIDI Bridge. |
ReaLearn:
-
Local port: This needs to be the same as configured for "Port (outgoing)" in TouchOSC.
-
Device host: This needs to be the same as displayed next to "Local IP Address" in TouchOSC.
-
Device port: This needs to be the same as configured for "Port (incoming)" in TouchOSC.
-
Read about OSC devices in the user guide if you are unsure where to enter this data.
{osc_preset_content}
Works for both control and feedback.
This recent version of TouchOSC fixes the issue with X/Y controls. It’s able to receive the feedback values for X and Y on different OSC addresses, which is perfect for the way ReaLearn works (one mapping per axis).
|
Note
|
If you want to send a color value to TouchOSC, use the feedback argument style.color.rrggbb.
This sends a string instead of a native OSC Color value (latter is not supported by TouchOSC).
The string can be directly mapped to a color property in the TouchOSC editor.
|
TouchOSC:
-
Press the button with the chain link icon on the editor toolbar → OSC
-
Connection 1:
UDP -
Host: {osc_host_instruction}
-
Send port: {osc_port_instruction}
-
Receive port: {osc_port_instruction} Preferably the same number as Send port.
-
Zeroconf: Disabled
-
|
Important
|
In general, you need to set it up using OSC, not the TouchOSC MIDI Bridge. |
ReaLearn:
-
Local port: This needs to be the same as configured for "Send port" in TouchOSC.
-
Device host: This needs to be the same as displayed in TouchOSC when you click the ⓘ icon next to "Receive port". It should be starting with
192.168. -
Device port: This needs to be the same as configured for "Receive port" in TouchOSC.
-
Read about OSC devices in the user guide if you are unsure where to enter this data.
{osc_preset_content}
Works very nicely, including 10-bit fader resolution and feedback for motorized faders and LEDs.
Tested with firmware v2.12.
Please start the device in "Mackie" control mode (channel 1 since firmware version 2).
Important: "Mackie" mode is preferred over "User defined" mode, even if "User defined" by default transmits the same messages and therefore also just works. The significant difference is that "Mackie" mode supports the complete 10-bit fader resolution (1024 different values) whereas "User defined" mode uses only 7 bits (128 different values). It’s a complete mystery to me why they don’t use the full resolution in "User defined" mode. But that’s no problem, just make sure you use "Mackie" mode. It provides the best settings out of the box. Leave the customization to ReaLearn!
-
iCON Platform M+: Preferred because also provides a controller layout.
-
Mackie Control: Also works but doesn’t offer a controller layout.
4.19. Korg nanoKONTROL2
There are unofficial presets contributed by ketstert.
-
Korg padKONTROL (contributed by Roger Green)
-
Made for scene 1 and channel 15.
-
4.21. Nektar Panorama P6
There’s an unofficial preset contributed by Torsten Anders.
There’s an unofficial preset contributed by Bassman.
This controller works well with ReaLearn, including feedback and LED color selection. There’s a multitude of very Launchpad-specific features that’s not directly supported though.
I always press "Setup" + the upper left pad to put this device into "Live" mode.
All presets assume "Live" mode.
-
Novation Launchpad Pro
The screens of this device are extremely flexible. That’s why I decided to not add built-in support but provide a Lua script for ReaLearn’s MIDI script source.
You can adjust this script to your needs. It allows you to leverage all of the possibilities this keyboard gives you in terms of screen and LED control. Watch this video to get an idea of what you can do with it.
-
Put the SL MkIII into InControl mode by pressing the corresponding button on the keyboard!
-
Use the MIDI output "SL MkIII InControl" and add a mapping with a Lua "MIDI script" source!
All presets assume "InControl" mode.
-
Novation SL MkIII - Pot Control (Lua preset)
Works both for control and feedback.
-
Local port: Set this to the same value as "Send to port" in OSC/PILOT (by default 8001).
-
Device host: Set this to
127.0.0.1if OSC/PILOT runs on the same computer as REAPER, otherwise to the IP address of the machine on which OSC/PILOT runs. -
Device port: Set this to the same value as "Listen on port" in OSC/PILOT (by default 8000).
This works well, including 10-bit fader resolution, feedback for the motorized fader and turning LEDs on/off.
|
Note
|
If you turn on the Off button LED, the fader will be disabled. This seems to be a behavior built right into the hardware. |
This device needs to be initialized with some custom MIDI messages to enter a particular mode. However, ReaLearn does this for you automatically if you use the FaderPort Classic controller preset.
-
PreSonus FaderPort Classic
Works well, including 10-bit fader resolution and feedback for motorized faders and turning LEDs on/off.
There’s no specific support for the built-in displays yet. However, the owner’s manual nicely describes what system-exclusive MIDI messages need to be sent to the device in order to change what’s displayed. ReaLearn v2.5.0+ supports sending system-exclusive MIDI messages whenever mappings get activated or deactivated, so in theory the displays could be operated. Future ReaLearn versions might make that easier. Same story with setting LED colors.
Please start the device in "Studio One" operation mode. This mode should be the default. If not, press the first two Select buttons while powering the device on and then press the first Select button.
MCU mode also works, but just partially and it doesn’t offer complete customization of each control element.
-
PreSonus FaderPort 8
4.29. RME ARC USB
There’s an unofficial preset.