##Kubernetes Introduction
Kubernetes is an open-source container orchestration platform that automates the deployment, management, scaling, and networking of containers.

It was developed by Google using the Go Programming Language, and this amazing technology has been open-source since 2014.
minikube start
minikube dashboard
minikube stop
kubectl config view
kubectl cluster-info
kubectl proxy
# This opens a proxy to kubernetes REST API
curl http://localhost:8081/
# Get the token
TOKEN=$(kubectl describe secret $(kubectl get secrets | grep default | cut -f1 -d ' ') | grep -E '^token' | cut -f2 -d':' | tr -d '\t')
# Get the API server endpoint
APISERVER=$(kubectl config view | grep https | cut -f 2- -d ":" | tr -d " ")
# Access the API Server using the endpoint and credentials
curl $APISERVER --header "Authorization: Bearer $TOKEN" --insecure
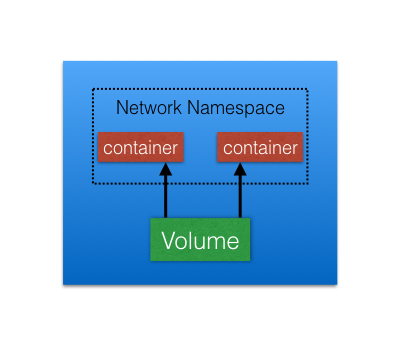
A Pod is the smallest and simplest Kubernetes object. It is the unit of deployment in Kubernetes, which represents a single instance of the application. A Pod is a logical collection of one or more containers, which:
- Are scheduled together on the same host
- Share the same network namespace
- Mount the same external storage (Volumes).
Pods are ephemeral in nature, and they do not have the capability to self-heal by themselves. That is why we use them with controllers, which can handle a Pod's replication, fault tolerance, self-heal, etc. Examples of controllers are Deployments, ReplicaSets, ReplicationControllers, etc. We attach the Pod's specification to other objects using Pod Templates, as we have seen in the previous section.
Kubernetes code uses the repositories in this directory via symlinks in the
vendor/k8s.io directory into this staging area. For example, when
Kubernetes code imports a package from the k8s.io/client-go repository, that
import is resolved to staging/src/k8s.io/client-go relative to the project
root:
// pkg/example/some_code.go
package example

import (
  "k8s.io/client-go/dynamic" // resolves to staging/src/k8s.io/client-go/dynamic
)
Once the change-over to external repositories is complete, these repositories
will actually be vendored from k8s.io/<package-name>.
-
Send an email to the SIG Architecture mailing list and the mailing list of the SIG which would own the repo requesting approval for creating the staging repository.
-
Once approval has been granted, create the new staging repository.
-
Add a symlink to the staging repo in
vendor/k8s.io. -
Update
import-restrictions.yamlto add the list of other staging repos that this new repo can import. -
Add all mandatory template files to the staging repo as mentioned in https:/kubernetes/kubernetes-template-project.
-
Make sure that the
.github/PULL_REQUEST_TEMPLATE.mdandCONTRIBUTING.mdfiles mention that PRs are not directly accepted to the repo. -
Ensure that
docs.gofile is added. Refer to #kubernetes/kubernetes#91354 for reference.
If using ManagedAuth, replace the template variables in tasks/add-auth-client-bare-pod.yaml. Apply this file, check it for completion, and delete it. Repeat for each client ID.
- Expose your application to the world by replacing the template variables in
ingress/nginx-https.yamland applying it.
Obfuscate any secret values - those in config/secrets.yaml and tasks/add-auth-client-bare-pod.yaml and check in all files in k8s.
For application updates that do not require database schema changes, build the Docker image and push it to the registry with gcloud. If you are tagging images correctly, just set the image of your deployment:
kubectl set image deployment/api-deployment <app-name>=gcr.io/<project-id>/<app-name>:<tag> -n <app-name>
If you are reusing the latest tag, delete all pods in the api-deployment.
kubectl delete pod api-deployment-xxxxxxx-xxxxx -n <app-name>
The pods will automatically be recreated and will pull the most recent image.
If a database update is required, make sure to run aqueduct db generate before building and pushing the Docker image. Then follow the instructions in step 5 before deleting pods.
*Note: This scheme is useful for development. When deploying to production, a unique tag should be used for each image and that image name should be added to the api-deployment-and-service.yaml. Instead of deleting pods, re-apply this configuration file:
kubectl apply -f k8s/api-deployment-and-service.yaml