Getting Started
Getting started using the AIC-Expresso project (for developers)
You can check out from the project's GitHub repository directly. For this you will require a Git client; see the following for useful instructions:
- https://help.github.com/articles/set-up-git/
- https://help.github.com/articles/which-remote-url-should-i-use
Using the Command Line and Maven
AIC-Expresso consists of a single Maven pom.xml file and can be built from the command line using Maven as follows:
mvn clean test
Using the Eclipse IDE
Note: This connector is required to properly set up resource paths for ANTLR generated parsers.
- Select the menu item
Window->Preferences... - Select the
Maven->Discoveryconfiguration option:
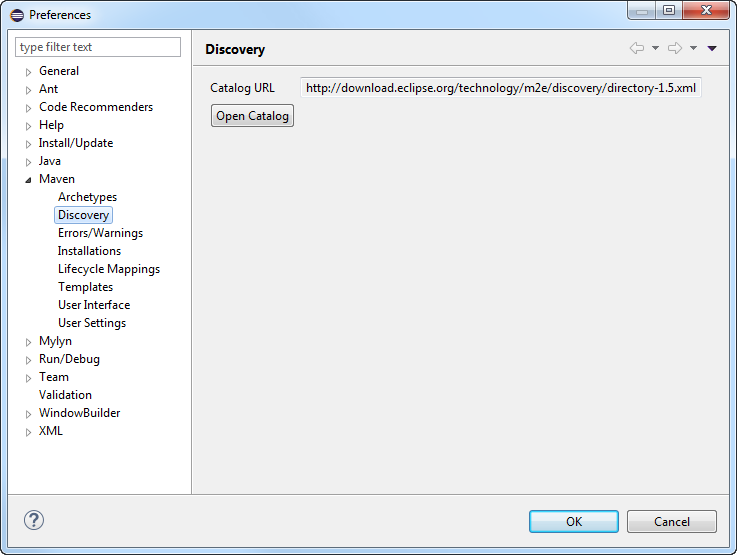
- Click the
Open Catalogbutton. - In the
Install me2 connectorsdialog, select thebuildhelperconnector (if it does not show up in the list, you may already have it installed; this can be checked in Eclipse's Help -> Installation Details):

- Click the
Finishbutton. - In the
Installdialog, click theNextbutton:
- Follow the sequence of
Install Details, clickNextbutton,Review License, clickI accept terms of the license agreement, and click theFinishbutton. - A dialog will then pop up with a security warning stating that the software to be installed is unsigned. Click the
OKbutton. - You will then be asked to restart Eclipse, click the
Yesbutton.
Before setting up your aic-expresso workspace you should first setup the AIC-Util workspace as aic-expresso is dependent upon it.
Note: You will require a GitHub account, and a clean workspace, for these steps to work correctly.
- Select the menu item
File->Import... - In the Import
Selectdialog, selectGit->Projects from Git:

- Hit the
Next >button. - In the
Select Repository Sourcedialog selectClone URI:

- Hit the
Next >button. - In the
Source Git Repositorydialog enter the URIhttps:/aic-sri-international/aic-expresso.gitfor the project and your own GitHubUser:name andPassword::
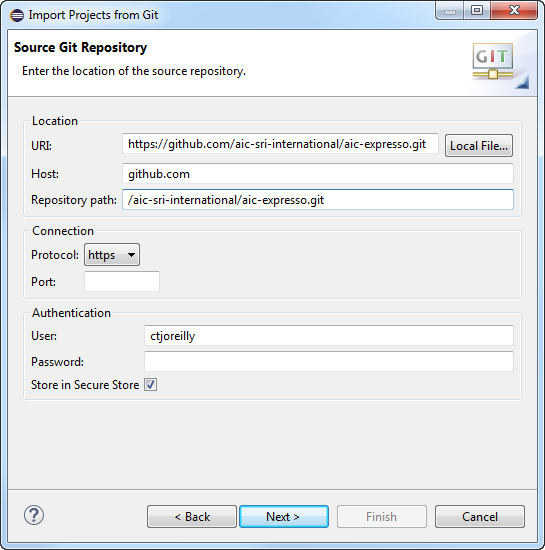
- Hit the
Next >button. - In the
Branch Selectiondialog only select themasterbranch:

- Hit the
Next >button. - In the
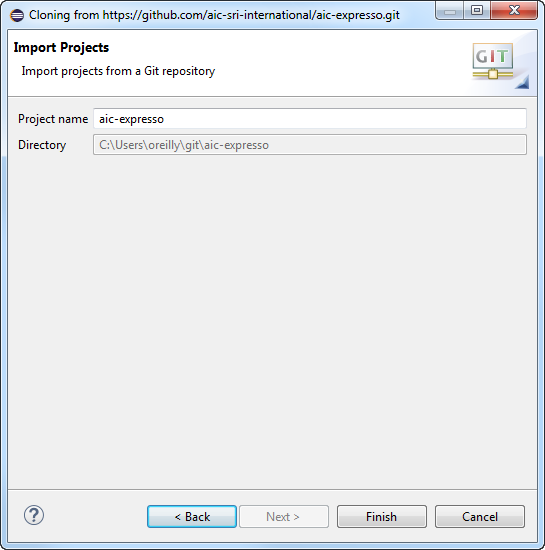
Local Destinationdialog enter theDirectory:where you would like your local copy of the AIC-Expresso Git repository to be placed:

- Hit the
Next >button. - In the
Select a wizard to use for importing projectsdialog, select theImport as general projectoption (Note: this dialog may take a while to enable as it will be downloading a copy of the repository to your local drive):

- Hit the
Next >button. - In the
Import Projectsdialog:
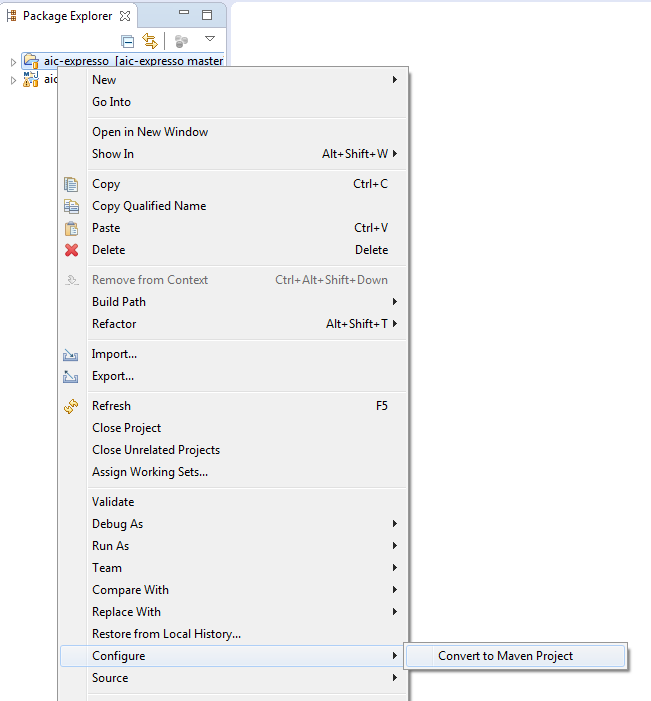
Hit theFinishbutton. - This step is about turning your project into a Maven project (which is a project building tool). It may be unnecessary if you are using an Eclipse version whose Import dialog includes a Maven option and you selected that (or left it selected as a default). If not, select the project in the Eclipse
Package Explorerand bring up the context sensitive menu (right click under Windows) and selectConfigure->Convert to Maven Project...:
- You should now be able to build and test the project from within Eclipse. Note: You may need to clean and build the project twice initially. This is because the main source is dependent on code being generated by the Antlr parser generator on the first compilation.